Getting the most from the design application |
|
THE SERVICEBy interactively designing you are able to customise a chosen design to your requirements. You then order online and within days you receive your printing.COMPATIBILITYThe Design program has been made with a mixture of HTML (the main language for writing Internet pages), Javascript (a fantastic language for providing interactivity) and Java (a fully fledged programming language for making online programs). Therefore to use this application you need to be on the Internet using the browser Internet Explorer 5 (or above) that is Java enabled & has Javascript turned on. As most of these features are enabled within Internet Explorer 5+ by default most users should not encounter any problems. However in the case of any difficulties in loading the application compatibility is the first issue to check.
In case you still experience problems we suggest you visit microsoft's site at windowsupdate.microsoft.com and click on the 'Internet Explorer' link to get the latest browser & the 'Product Updates' link to find all other components. You can also check to see if your Java environment is up to date by visiting www.java.com. If you see any annimations there you're OK, if not you can download the product there for free.
FIRST TIME USERSIf you have not already had a quick browse through the 1st Time User tutorial we suggest you do so before reading this section. However if you feel confident with the basics of Card Corporations system and want to learn about all the features in the design pages please read on.
THE PARTS OF THE DESIGN PAGE
There are 3 main parts to the design pages.
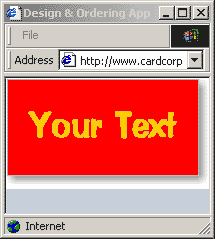
DESIGN DISPLAY(see fig.1) This shows a visual of your design which will update from the Editor's text tab section. You view your work as you progress. The design display always remains on screen. DESIGN PAGE STATUS BAR (see fig.1)Situated at the bottom of the 'Design Display' window this initially shows the loading status of the other 2 parts of the program. Once loaded the Bottom Bar will only need to be used when the Editor is hidden. It will then show buttons to redisplay the Editor (Show Editor), access the help pages (Help) & (Leave Ordering). |
||||
|
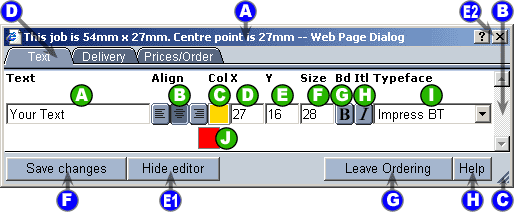
THE EDITOR(see fig.2)The Editor is a self contained window that floats above the design display in your main browser window. It is an all-in-one tool where all details for your design and order are entered. GENERAL EDITOR CONTROLS & TEXT TAB CONTROLS (fig.2)
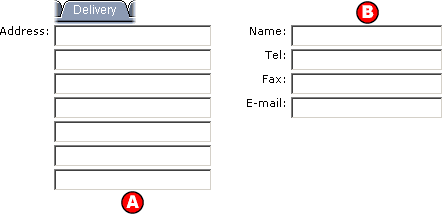
DELIVERY TAB CONTROLS (fig.3)
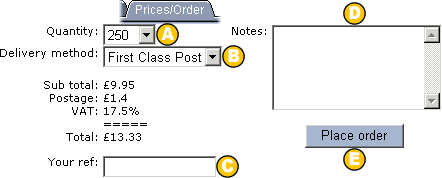
PRICES/ORDER TAB CONTROLS (fig.4)
|
||||
GENERAL EDITOR CONTROLS (see fig.2) |
||||
|
|
If you find that the Editor obscures the design display simply move it. The Editor can be moved just as any other window, by clicking & dragging its title bar with the cursor. The title bar also displays your designs final print size in millimetres. | |||
|
|
Use the scroll bar to the right of the Editor to scroll the Editors contents up & down. | |||
|
|
To resize the Editor vertically you can click and drag its edges or the resize icon at the bottom right. | |||
|
|
Clicking these tabs reveals the Editor's sections. The Editor has 4
tabbed sections, these are Text, Pictures, Delivery & Order/Prices.
You can move between these tabs in any way you wish as long as the
details are correct & complete when clicking the final order
button. Text - In this page you control all the design features that are accessible for the particular product with which you are interacting. Delivery - Enter your delivery details within this page. Pictures - Select new images for any swappable pictures in your design. (Most products do not have this feature) Prices/Order - Enter your order details here. |
|||
|
|
Hides the Editor. When the Editor is hidden 3 buttons 'Show Editor', 'Help' & 'Leave Ordering' are displayed at the bottom of the window containing the 'Design Display'. You can also use the X box at the top right of the Editor to hide it. | |||
|
|
Save regularly! This ensures that you don't lose your work through PC crashes, program errors or those annoying instances when you ISP logs you off the Internet. When you have made changes to your design a message to the right of the tabs (see point D) saying 'Order modified - press save to make permanent' will appear. This message disappears on saving. | |||
|
|
Leave ordering returns you to the main site. | |||
|
|
If you need help you can open a help page at any time by clicking this button. | |||
TEXT TAB CONTROLS(see fig.2)Here all the text lines & colours are edited. The details you enter into the Editor are automatically show in the Design Display. There is about a second delay between entering your details and your updated design showing, so please be patient. |
||||
|
|
Type your details into these text boxes. Changes are show almost instantly in the design display. If you have too many lines simply blank the lines you don't need by deleting their text. | |||
|
|
These buttons adjust your text to the right, centre or left of a position measured from the left hand edge of the design (in millimetres). To change this position you adjust the figures entered in the 'x' boxes (see point E). | |||
|
|
Click to open the colour grid, then select one colour for each line of text. | |||
|
|
These figures move the text lines left & right ('x' box values measured in millimetres). This in conjunction with the text lines alignment (see point B) determine the exact location of the text. | |||
|
|
The 'y' values move the text lines up & down. The value is the number of millimetres the bottom of the line is from the top of the design. | |||
|
|
The 'Size' of the text is measured in typographical points. This is a standard measure throughout the printing industry. Metrically 1 point equates to 0.353 millimetres. | |||
|
|
The 'Bold' button makes the text line just that. | |||
|
|
The 'Italic' button slants the text to the right. | |||
|
|
Click to show the interactive list of typefaces. Select one and wait a moment for it to load. | |||
|
|
Clicking reveals a number of colours for your background. Click one to change. Please note that some products/designs have a limited colour range or no alternative options at all, this is to ensure that they print to the best quality possible. | |||
|
DELIVERY TAB CONTROLS(see fig.3) |
||||
|
|
Insert your delivery address details, this does not have to be the same address on your design. | |||
|
|
Enter your contact details. If we have any queries about your order we may need to contact you. | |||
PRICES/ORDER TAB CONTROLS (see fig.4) |
||||
|
|
Select the quantity you require. | |||
|
|
Select the delivery method. All or some of the methods will be available depending on the product you are ordering.
1st Class Post - Cheapest but no delivery guarantees Courier - Faster (Next day delivery after despatch), guaranteed delivery at £4.00. International Courier - FOR DELIVERY OUTSIDE THE UK. |
|||
|
|
For your Reference number to appear on your invoice/reciept. | |||
|
|
For additional instructions/concerns. | |||
|
|
Once all your design, delivery & order details are complete & correct click here. Please ensure that all details are checked as orders are processed rapidly and it may not be possible to interrupt the work-flow with amendments. | |||


